Blog
|
In my previous blog post, from coach to full-time artist, I shared the thought process that went into this career change. But you may be wondering what were the 'boots on the ground' steps that I took to make this transition. Let me see if I can walk you through the steps. First of all, from all my years in my coaching business and my fine art jewellery business - I'm a certified goldsmith as well as a certified life coach, I had a list of contacts. What's a list? It consists of the private emails that people have given me over the years as well as my social media following. Now you might be thinking - those people aren't going to follow this radical shift in profession. How do you begin again with a whole new product? You simply let them know that you are making a change. That's it. Some will leave, that is okay, while others will join in, partly to watch the transition, and partly because they are curious what you can create. My number 1 advice is get a list, nurture your list, stay in touch with people who already have an interest in you. If you don't have a list, start now. It's pretty easy. All you need is a mail sending program. I recommend Active Campaign, Constant Contact, or Mailchimp. Then simply invite family, friends, work colleagues, your dentist, your hairstylist, whoever you can think of to join you. Every month compose an email letting them know what you are up to. No need to get all widgy about it. Write the email as if you are speaking to one person and once a month send them updates, images anything of interest going on in your creative life. I have a very simply theory about my art business.
Not so easy. Let's start with point #1 Create lots of great art. #1 Figure out your materials. #2 Figure out how to organize yourself. Materials. Okay, so you are starting out, you don't really know what you are doing, where do you even begin? In my case it was pretty easy. I don't like mess. Charcoal, graphite, pastels, conté..... not interested. Too messy for me. I don't like my hands getting dirty. I don't even like eating fruit that gets me messy - drippy oranges.... oh no. Ick. I also knew from experience that acrylics dry too quickly for me to enjoy working with them. Now oils, they scared me at first, because, come on, they are oil paints. The prestigious material of the masters. Who am I to use this highly regarded material? Note to self: changing our mind about who we are is a constant process when you are exploring a fine art career. a) decide on the materials that you are drawn to work with, and start figuring out how to use them. What are the techniques to applying this medium? What surface is best for it? Is there any special surface prep or finishing that I need to be aware of? This is where the library came in really handy. There are so many books to help with the technical stuff. b) spend the time to learn how to use the materials. Great to read it online or in a book, but until you actually practice you have no skills. At first you will likely be disappointed with what you produce, this is always the case because what we imagine is possible, is not actually possible with the skills that we have. Don't be discouraged. You can acquire the skills, it simply takes a bit more practice. Organizing yourself Being an artist is very much about being self-motivated. You are on your own when it comes to inspiration and doing the work. You have yourself to rely on, which is the good news/bad news. One thing that helps me so much is my schedule. Very early on I timed myself, from start to finish, of a piece. Literally, when I start composing an image, transferring that image to canvas, preparing the canvas, and every step thereafter, I had a timer running. I use a free program called Clockify. It allows me to set up projects, those projects are each individual painting I plan to paint. When I start on the concept of the painting, I start clockify. When I get up for a cup of tea, I stop the timer. You get the idea. What I'm most interested in tracking is the actual time it takes to create that project. Once I have the time for a given piece, then I can calculate the minutes per square inch that I took to create that piece. This has been such valuable information as I plan my career.
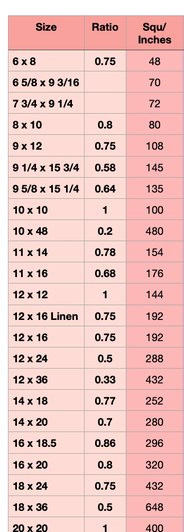
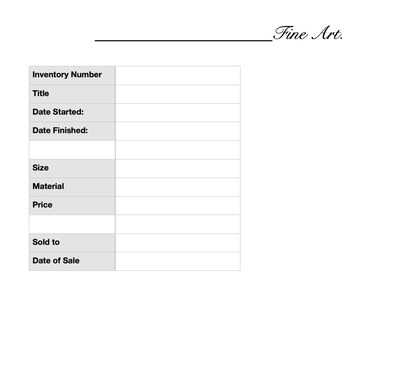
This is what used to happen. ( internal self talk) "You scheduled 15 paintings this month and based on your painting speed that will take you 85 hours to produce. This month you have been able to paint for 30 hours. No wonder you are not able to reach your goals." Do you see how valuable this can be? When you have a better idea how long each piece takes you, and how many total hours in a week/month you have to paint then you can set appropriate goals and actually reach them. When I started keeping track I was taking 6.2 minutes per square inch. Now I'm averaging 2.5 minutes per square inch. Part of that change is from changing my process. I no longer do a full "grisaille" or greyscale underpainting. As a full time artist I don't have a boss telling me which items are a priority and how to use my time. I have to do that for myself. I'm a big proponent of producing painting in a series, a group of 5 or so paintings that will hang together as a unit. This could be by size - all 12 x 12", or by subject - all landscapes, or by price - all under $400. This helps your audience understand what you are promoting. It also gives potential buyers a choice within a given theme. My Process 1) I take my own source photos so I have control of the image I work from. There is no copyright that I have to be concerned about when it is my own image. Plus I can compose and capture the lighting of the image just the way I like it. 2) Once back at the studio I load my images to my computer and sift through them looking for the really special ones. 3) From this first selection, I do compositional studies to determine and isolate what my focal point will be and what sorts of shadows/lines will help reinforce that composition. Each image does not necessary compose well. When the dimensions of the composition have been worked out I can decide on the canvas size for the painting. Let me walk you through this. With an image that has been cropped to 63mm x 71mm (I place a plastic ruler up to my computer screen to measure the width and height). I then divide 63 by 71 = .88 This is the ratio between the short side and the long side of the painting. (Always divide the small number by the larger number) I have created a spreadsheet chart with the common canvas sizes and their ratio, just to make it easier to pick an appropriate canvas dimension with this ration. 0.88 is a bit of an odd ratio. At this point I have a couple decisions to make. I can go back to the composition and change it slightly to arrive at a different ratio or I can choose a canvas that is close to the .88 and make it work. I see that the 16 x 18.5" is 0.86. That will likely work just fine. Now at this stage, I create an inventory sheet for that piece. Here's a blank sheet that you are welcome to emulate. This inventory sheet is printed on regular 8 1/2 x 11 sheets of paper and slipped into a plastic page protector. I slip a photo of the proposed painting, which I print out on regular printer paper, just as a reference, into the sleeve as well. I fill in as much detail a I know at this stage. The size of the canvas has been determined, so it goes in that space. etc. I will also apply an inventory number and often a title.
Next to the size of the canvas I will add the calculation of timing. Let's calculate this based on the 16 x 18.5" canvas for this .88 ratio piece. Multiply 16 x 18.5 = 296 square inches x 2.5 minutes /squ. inch = 740 minutes / 60 minutes = 12.5 hours. This painting should take me 12.5 hours for the painting time, plus the canvas prep and image transfer time. 15 hours should do it. The next major number to figure out is how much time you have to paint. If you are working a full time job currently, then perhaps you have 4 hours per week that you have to dedicate to painting. That means this piece will take you 3.5 weeks to complete. I would then jot this down on a calendar with a completion date in mind and go for it. This helps so much with the procrastination/what do I work on now question. There is no doubt what you have to work on. Here's a caveat, shuffle projects around to focus on what you are inspired to create. Just because it's on the schedule doesn't mean that is the piece you 'have to' work on. You get to decide. Show your art to lots of people How are you going to show people what you are creating? Your list, your social media contacts, local shows, art fairs, juried exhibitions etc. These are just a few ideas of how to show your work to lots of people. You get to decide what works best for you. Keep in mind some of these opportunities have some upfront costs like booth rental and perhaps commissions that you will want to keep in mind. Note: Be careful that you can afford the upfront expenses before you commit to it. You don't want to have a resentful feeling towards the event if you don't sell anything and you've spent money you don't have to be there. It is very possible to sell your artwork and it is going to take time to find your collectors. Just because you are going into the local art fair does not mean you are going to sell anything. Yes, you will get exposure and know that your entrance fees are giving you that, for sure. However, check that you don't have big expectation of high sales right off the bat. In my experience, this is simply not that common. Make it easy for people to buy from you. This is a big piece that many people overlook. If for example you are relying on e-transfers to be the sole way you recieve money for your pieces then I would encourage you to look for alternate methods. Here's why.... many people do not bank online, do not feel comfortable with the technology, and don't want to be embarrassed that they are not savvy with this. It's a hurdle. Now most people have gotten accustomed to using a tap process. To make it easy for your clients to purchase from you get yourself a tap device. Square is a reliable source for this and the one time fee is about $50 for the device. This will enable you to collect payment by debit card or all major credit cards. Pretty slick. When you receive your square tap device, you will be prompted to hook up your bank account to the device. This is secure so you needn't worry. When you hook up your account square will send you a small amount, and then withdraw that same amount. This will ensure that the connection with your bank is working properly. This takes a few days to do that, so make sure you have time for this process to happen. Once you have a square account you will be able to take payment with your tap device and you will also be able to send a client an invoice by email that they can then pay with their credit card on their end. This is super handy when your client is not in your local area. With your email list, social media presence, and your tap device/square account you are now ready to start spreading the word about your work. The next business element I encourage you to consider is to purchase a domain name (Namecheap is my recommendation for purchasing domain names) appropriate for your art business and create a simple website. One step at a time. I use Weebly which is partnered with Square. Squareup, different than Squarespace, is another option as is WIX etc. I hope this is a help. It may seem a bit confusing at first, however, begin at the beginning by deciding what your medium of choice is and get started producing the work you feel inspired to produce. |
Loading... Archives
June 2024
|
|
Join my VIP email list. First access to new work. Relevant content only, spam free. ↓ |


